Updated 2025-07-07
Introduction
This is the documentation for deploying and operating the REI3 application platform. It assumes some knowledge for the target infrastructure (Windows Server or Linux). Once running, administrators can deploy REI3 applications from online or local repositories in infrastructures with or without internet access.
Deployment models
Depending on the available IT infrastructure and how REI3 is to be used, different deployment models exist:
| Dedicated | Stand-alone | Portable | Docker | |
|---|---|---|---|---|
| Designed for | production | production | test / build REI3 apps | test / build REI3 apps |
| Integrated database | X | X | X | |
| Runs on Windows | X | X | X | X |
| Runs on Linux | X | X |
If you intend to build your own REI3 applications, it is good practice to build REI3 applications with one system and then deploy to another for production. This way, users are only affected once applications are tested and ready. Especially the portable & Docker versions can quickly be installed on PCs for building applications.
Dedicated
The most common deployment option. REI3 is installed on an application server (Windows or Linux), connecting to a separate database system.
Stand-alone
This option is available on Windows Server only. The stand-alone deployment has almost no external dependencies and comes with its own database. It is the recommended model for organizations with small IT teams.
Portable
For development and test instances - the portable version of REI3 can be started on Windows clients without any setup. Like the stand-alone model, the portable version comes with its own database. It is not recommended to run anything productive from a portable instance.
Docker
For development and test instances - a Docker Compose file is available to quickly spin up a REI3 instance. This file is not configured for productive use however. To run REI3 productively with Docker, you can use the provided files as templates and adjust them to your environment. More details on the repository page.
Technical requirements
Server
To run REI3 the following requirements must be met:
- Operating system (one of them)
- Linux (tested on Debian, NixOS and Ubuntu Server)
- Windows Server 2016 or later
- Windows 10 or later (portable version)
- Processor
- Intel, AMD or ARM processors (x64 or ARM64), multiple cores provide better performance
- Memory
- 4+ GB
- Disk space
- 500 MB for REI3 itself
- 20+ GB for the database and file uploads (scales with use)
- Software
- Linux server
- Optional: ImageMagick (for thumbnails)
- Optional: Ghostscript (for PDF thumbnails)
- Optional: PostgreSQL client tools (for integrated backups)
- Windows Server
- Required: Microsoft Visual C++ 2015 (or newer)
- Optional: Ghostscript (for PDF thumbnails)
- Linux server
- Databases (dedicated deployment only)
- PostgresSQL database (13.0 or newer), UTF8 encoded, with full permissions
Clients
To access a running REI3 instance, any modern browser can be used, like Firefox, Chrome or Safari. This includes mobile browsers. REI3 uses modern web standards; it does not support Internet Explorer.
Installation
On Windows Server
REI3 comes with a graphical installer for Windows Server. The installer supports both stand-alone and dedicated deployment models.
- Stand-alone: After following the installer, REI3 can be started immediately.
- Dedicated: After the installation, database connection details for an empty, UTF8 encoded PostgreSQL database (13.0 or newer) must be entered into the configuration file
config.json. The fileconfig.jsonis located inside the chosen application directory. The database user must have full permissions for the chosen database.
If you plan to run REI3 behind a proxy, please make sure to disable client timeouts for websockets. More details here.
Independent of deployment model, REI3 is handled as a Windows service and can be started with the service manager (command: services.msc). REI3 will write to the Windows application log, should the service not start correctly.
Because of licensing terms, we cannot distribute Ghostscript with REI3. If you want to create PDF thumbnails, you have to install a current version of Ghostscript on the REI3 server.
On a Linux server
For Linux servers, REI3 is available as a compressed archive with pre-compiled binaries. The installation steps are:
- Extract the REI3 archive file to a location of your choice (
/opt/rei3/for example). - Make the file
r3executable (chmod u+x r3). - Copy the file
config_template.jsontoconfig.json- keep it in the same directory as ther3executable. - Add connection details to an empty, UTF8 encoded PostgreSQL database (13.0 or newer) to
config.json. The database user must have full permissions for the chosen database. - Optional: Install ImageMagick and Ghostscript if you want to have thumbnails (
sudo apt install imagemagick ghostscript). - Optional: Install PostgreSQL client tools if you want to use the integrated backup feature (
sudo apt install postgresql-client). - Register REI3 with your service manager (
sudo ./r3 -install). - Start the REI3 service (
systemctl start rei3for example).
If you plan to run REI3 behind a proxy, please make sure to disable client timeouts for websockets. More details here.
If the service does not start, REI3 writes to syslog.
First access to REI3
When running, REI3 is by default reachable on port 443. You can use any modern browser to access REI3 locally at https://localhost/ or from the network, given a configured firewall. During installation, a single admin user is created; username and password are both 'admin'.
After login, an admin user can access the admin panel to manage users, install applications, access system logs and so on. The default password should be changed immediately.
Configuration
REI3s core configuration can be changed within its configuration file (config.json), which is located in the chosen REI3 installation directory. Setting file paths, web server port and database connection details is straightforward - for an explanation of all settings see here. Changes are applied when the application service restarts.
SSL certificates
During installation, REI3 creates a self-signed certificate to allow encrypted access to the application. It is not recommended to keep this certificate. If at all possible, a properly signed certificate should be provided for REI3 to ensure secure communication with trust between clients and server.
Some common considerations / pitfalls:
- REI3 can work with different certificates. If REI3 cannot load a certificate, it will fail to start and log to the operating system (
syslogfor Linux, Windows application log otherwise). - Make sure that the hostname that the certificate is set to, is the same as clients use to connect to the REI3 server. The port is irrelevant.
- When running REI3 internally (not reachable from the cloud), clients still need to be able to verify the certificate. Make sure that your certificate file (*.crt) includes all certificates up the chain until the one that is known to the clients - this is usually a trusted root or intermediary certificate.
Proxies
When clients talk to a REI3 server, they use two methods - both are running on the same port via TCP:
- HTTP(S) requests to load files, images and other web resources.
- A continuous Websocket connection for data exchange between server and client. If this connection breaks down, the client tries to re-establish it.
When it comes to proxy servers (regardless of forward or reverse proxy), HTTP(s) requests can be handled like any other web application. So good-practices such as request timeouts are sensible.
Websockets however are meant to stay active until either side (server or client) purposefully closes the connection. When configuring a proxy, request timeouts or max. session time for Websocket connections should be disabled or at least set to multiple hours. Some proxies (like HAProxy) call these connections 'tunnel'. Every time a Websocket connection is forcefully closed by a proxy, the client must re-connect and can loose unsaved changes.
In case of cluster-setups, a Websocket connection must 'stick' with one particular server until it´s closed. Even if the initial requests are assigned via round-robin, a particular server is responsible for ongoing Websocket communication with a specific client. HTTP(S) requests can however be handled by any cluster server at any time.
Configuration file
These are the settings inside the REI3 configuration file config.json for reference:
- db: Database connection settings.
- host: Database host to connect to. Can be a hostname or network address.
- port: Database host port to connect to. Postgres runs on 5432 by default.
- name: Database name to connect to. REI3 requires a user with full permissions to this database. To prepare a new database for REI3 follow this guide.
- user: Database user name to connect with.
- pass: Database user password to connect with.
- ssl: Connect to database host via SSL. Only works if database host supports SSL.
- sslSkipVerify: If 'ssl' is active, ignore if the provided SSL cannot be verified by the REI3 host system. This allows for an encrypted database connection even if the given certificate is untrustworthy.
- connsMin: Minimum number of database connections to keep open. If set to 0, REI3 will choose a number.
- connsMax: Maximum number of database connections that can be used. Limiting this can be useful if REI3 is running on a shared database system. REI3 should at least have 4 DB connections to itself. If set to 0, REI3 will choose a number.
- embedded: If true, REI3 starts its own internal database. True for stand-alone and portable deployments. When set to false, REI3 connects to an external database server.
- web: Webserver settings.
- cert/key: Names of certificate & key files for REI3 to offer HTTPS. If files do not exist, REI3 will create a self-signed certificate & key when started in HTTPS mode.
- listen: Network address to listen on. If set to 0.0.0.0, REI3 will listen for requests regardless of target address.
- port: Network port to listen on. If set to 0, a free port will be assigned by the operating system on service start.
- tlsMinVersion: The minimum TLS version REI3 should accept from clients. Allowed values: "1.1", "1.2", "1.3"
- paths: Paths where files/directories relevant to REI3´s operation are located.
- certificates: Certificates for the REI3 webserver component (see 'web'->'cert' & 'web'->'key').
- embeddedDbBin: Only relevant for portable/stand-alone deployments. Binary files for embedded Postgres database system.
- embeddedDbData: Only relevant for portable/stand-alone deployments. Data files for embedded Postgres database system.
- files: Files uploaded to REI3 for storage in attributes of the type 'files'. Contents is cleaned regularly by scheduled tasks when references are removed or file retention is satisfied.
- fileExport / fileImport: Only relevant if file export/import functions are needed by REI3 applications. Directories from which REI3 can export/import files to/from. Must be accessible to the REI3 server (or nodes if cluster setup). For security reasons, the REI3 server can only use these directories for export/import tasks.
- temp: Files uploaded temporarily to REI3 for various operations. CSV uploads, application imports, etc. Contents is cleaned regularly by scheduled tasks.
- transfer: Files uploaded to REI3 for application installation or update. Files are kept to enable future export of dependencies.
- mirror: Disables writing connectors (currently: email & REST) as well as integrated backups. Useful for REI3 instances that should mirror production systems for testing or development.
- portable: Only relevant for portable deployments. If true, REI3 will start in HTTP mode and open a browser to the REI3 start page.
- cluster: Cluster settings.
- nodeId: The ID assigned to this cluster node. Should not be filled by hand. REI3 will auto-generate and store a new node ID when a node first connects to a cluster.
General administration
After configuration, basically all administrative tasks are executed via the admin user interface inside the main REI3 web application. Any user defined as 'admin' has full access to these features.
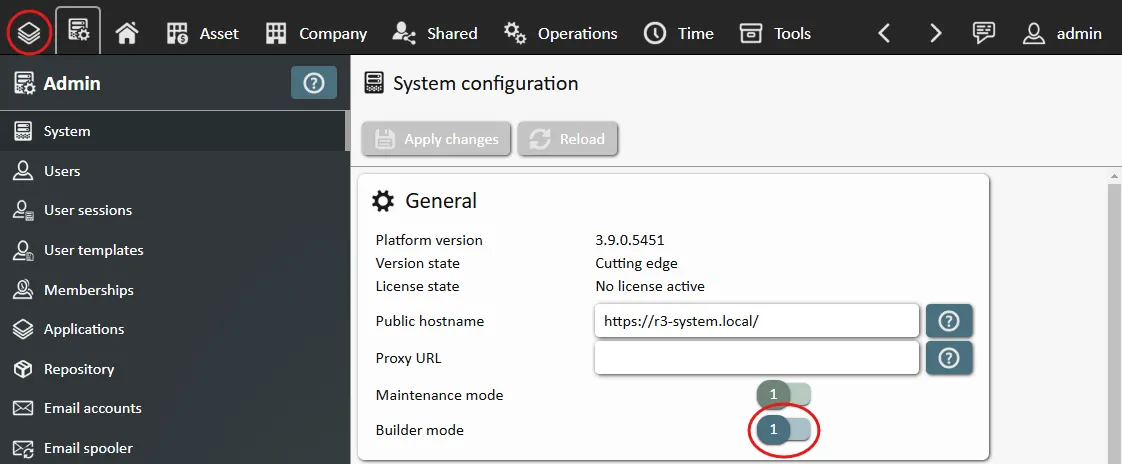
Maintenance mode
To execute deep system changes safely, a separate operation mode is available, called 'maintenance mode'. When enabled, all non-admin users are automatically logged off from the system; new logins are also rejected from non-admin users.

In maintenance mode, applications may be installed, configured and deleted. Please be aware that deleting applications will permanently delete all corresponding data from the system. This is irreversible without current, functional backups.
Builder mode
When the maintenance mode is active, Builder mode can also be enabled. This gives admin users access to the integrated, graphical application builder utility, called 'Builder' for short. The Builder is a powerful tool. All REI3 applications are exclusively created and changed via the Builder.
Please be aware that changing applications has permanent consequences up to and including data loss. Do not attempt to use the Builder in any productive instance. For testing or developing applications, a separated instance should be used. The portable version makes this easy on Windows clients. On Linux a separated application service, accessing a separate database, serves the same purpose.
Authentication and authorization
To manage user access and permissions, the REI3 admin panel includes a user management interface. Here any user with the admin flag can create, edit and update permissions for users.
REI3 currently supports four authentication options:
- Local: Users are created inside the REI3 admin panel and log in with their credentials.
- OAuth2: Users are forwarded to an OAuth2 identity provider, authenticate with it and are returned to REI3 to log in via OpenID Connect.
- LDAP: Users are regularly imported from an LDAP source (often Active Directory). During login, their credentials are checked live against the LDAP.
- Public: Users log into REI3 with a pre-defined URL.
Regardless of authentication, each user requires a unique name. This can be anything from names to email addresses to personnel numbers.
To manage access to applications, roles are assigned to users. Role permissions are cumulative - the more roles the more access a user has.
Role assignment can be done manually by admin users in the internal user management - or automatically via role mapping when users are originating from outside REI3:
- OAuth2: Roles can be mapped based on the contents of a claim in the users´ ID token.
- LDAP: Roles can be mapped to group memberships of the authenticating user. In Microsoft Active directory, nested groups are supported as well as automatic user deactivation in REI3 when the LDAP user account is disabled.
MFA (multi-factor authentication) in the form of TOTP (time-based one-time-passwords) is available to users for local & LDAP authentication. MFA can be setup on multiple devices and is supported by most authenticator apps (anything that supports TOTP). Admin users can reset MFA for users if necessary.
Manage applications
To get use out of REI3, applications need to be installed; for this the maintenance mode must be enabled.
Applications are installed via the admin user interface. They can be retrieved from multiple sources:
- Official repository: Pre-installed repository for official REI3 applications. Internet access is required to access this online service.
- Local repository: For organizations running multiple REI3 instances and/or needing full control over all releases. A repository can be installed on any REI3 instance as it is a REI3 application as well.
- Manual import of applications: All applications can be imported manually. This is useful for development releases, testing and for applications not released in any repository.

Organizations starting with REI3 should rely on the official repository, switching to local ones when they scale up or self-developed applications become more prevalent.
Backup and recovery
To fully recover a REI3 instance, these components must be backed up:
- The REI3 database
- The REI3 configuration file (
config.json) - Directories (can be renamed in
config.json)certificates(used SSL certificates)files(uploaded files)transfer(installed applications)
The integrated backup feature automatically backs up all necessary data, if its enabled in the admin panel and dependencies are installed.
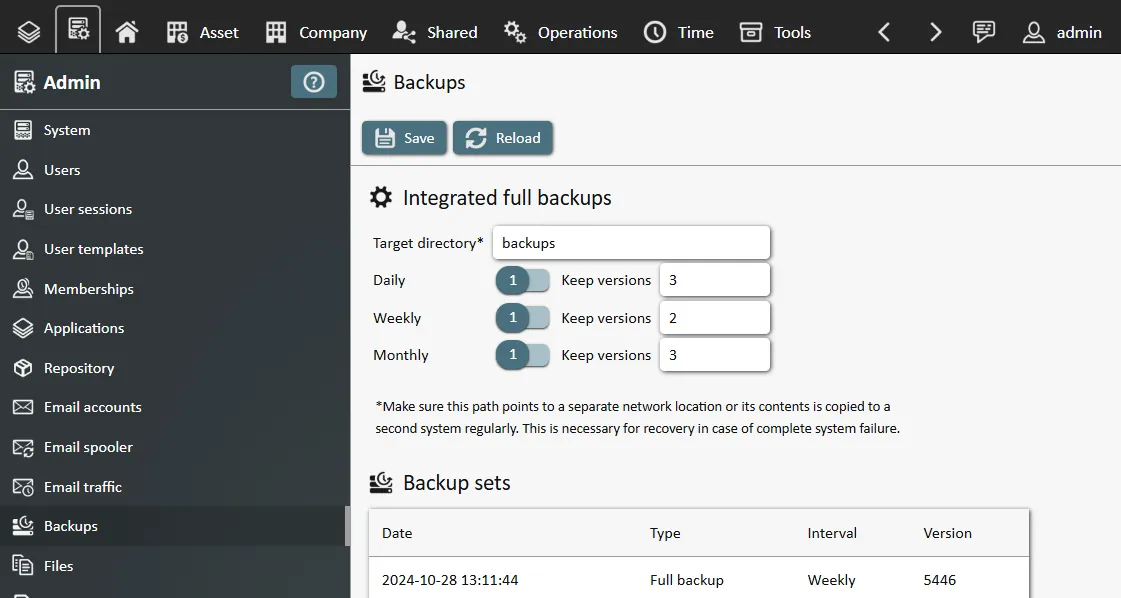
With larger systems, the integrated backup might not be good enough; it can only create full backups, which are very safe but take more time and disk space than other backup methods. With growing data sets, you might need to consider also using incremental/differential backups; these require more effort and possibly infrastructure and are not part of this documentation.
Database
In any deployment model, a PostgreSQL database is used for REI3. To access the stand-alone, integrated database, use the connection details from the REI3 configuration file (config.json) while the REI3 service is running. The database is called 'app' by default.
For full backups, we recommend using internal PostgreSQL tools, like pg_dump to backup and pg_restore to recover the database. Examples:
- To backup to a directory: pg_dump -h HOSTNAME -p 5432 -U USERNAME -Fd -f TARGETDIR
- To recover from a directory: pg_restore -h HOSTNAME -p 5432 --no-owner -U USERNAME -d TARGETDBNAME SOURCEDIR
Good practices:
- Always backup to a separate network location, in case the system fails completely.
- Recoveries of full backups should always run against an empty / new database to make sure that all data can safely be recovered to the backed up state. The recovered database can then be renamed or the REI3 configuration file updated to access the recovered database.
Updates
There are 2 kinds of updates to be handled - application updates and platform updates. Application updates are more common and serve to expand functionality for REI3 applications. These updates can be installed directly from the admin user interface, when the maintenance mode is active. If the updates are received via repository, its a single-click operation. Manual updates must be provided via packaged application files. It is good practice to install updates in testing environments first as looks and behaviour can change between application releases.
Platform updates address the underlying platform software and might be necessary for application updates as well, if these require newer platform features. Because security and stability issues are fixed with platform updates, it is always good to update the platform itself.
Platform updates
If the graphical installer for Windows is used, an update can be directly started by executing a later version of the installer. The platform service will automatically be restarted.
For Linux servers, stopping the service and overwriting files in the chosen application directory with the latest extractable package is required. Afterwards the service can be restarted.
To update the portable version, stop any running REI3 instance and extract the contents of a later portable version into the portable application directory.
Preparing a new PostgreSQL database
REI3 in the dedicated deployment model requires full permissions to a UTF8 encoded PostgreSQL database. This documentation does not cover installation of PostgreSQL on the operating system of your choice. Once the PostgreSQL service is available however, connect with a PostgreSQL client (like psql or pgAdmin) and make sure that both a user as well as database exists for REI3 to use. To create both:
CREATE ROLE my_rei3_user WITH LOGIN PASSWORD 'MY_STRONG_PW!';CREATE DATABASE my_rei3_db WITH OWNER = my_rei3_user TEMPLATE = template0 ENCODING = 'UTF8';
Clustering and system performance
REI3 servers can be clustered to enable more requests and users to be handled at the same time. Before considering clustering, it is important to learn where perceived performance issues are coming from. REI3 is built to handle many users concurrently and is also able to use multiple processor cores and more memory to improve performance. Only if the CPU load/memory usage of the REI3 service is often very high, clustering multiple REI3 servers can make sense.
In most cases, performance issues come from other sources:
- High database load. When running larger REI3 instances, the amount of requests can be too much for the database system. This can be seen by connecting to the database server and looking at its statistics. In this scenario, the REI3 service will be idle, while the database is overworked. To improve performance, the database system would need to be upgraded - either with better hardware or with clustering of the database system itself. Note that REI3 only supports clustered databases with the dedicated deployment model. Clustering REI3 itself would not improve performance in this case.
- Missing or badly used indexes on database relations. This can be seen when connecting to the database server and running benchmarks on problematic requests. If indexes are not optimized, the author of the affected application can easily improve performance by updating them. Clustering REI3 would not result in any performance improvement in this case.
- Slow storage. Either the database system or REI3 itself is accessing slow storage systems. This can be seen, when both the REI3 application service and database system have very little load but requests still take a long time. In this case, improving latency/throughput of the underlying storage system will have the most impact on performance. Clustering REI3 servers would not help.
Is the REI3 service actually the bottleneck, clustering can help - for this, the following requirements must be met:
- REI3 must be running in dedicated deployment mode, meaning the database system must be separate from REI3 itself. Switching from stand-alone deployment to dedicated is always possible.
- REI3 servers must access the same storage location for their file paths.
- REI3 servers must access the same database.
- It does NOT matter, whether REI3 servers are running on different operating systems or processor architectures.
Setting up clustering itself is very simple:
- The first REI3 server is by default already part of a one-server cluster, with itself as the cluster master. Nothing needs to be done here.
- To add additional server nodes, install REI3 on other servers and use the same database and file path settings in the REI3 configuration file
config.json.- The file paths for the entire cluster must point to the same storage location - usually networks shares work well for this requirement.
- Choose any configuration in the 'web' part of the configuration file that fits with your infrastructure (which port to use, how certificate files are named, etc.).
- The
cluster/nodeIdmust be left empty for new server nodes.
- As soon as a new server node connects to the existing REI3 database, it will register itself as a new cluster node and assigns itself a unique node ID.
This is the entire setup. The cluster auto-configures and also automatically assigns cluster master role and tasks depending on which nodes are checking in.
Cloud operations
REI3 can be made accessible on the internet by opening up corresponding firewall ports. We, the REI3 manufacturers, aim to make the platform as secure as possible. As with any other application, it is always possible that undiscovered security flaws are exploited and unauthorized access achieved. Besides regularly updating REI3 itself, it is our view that additional safety measures are necessary to safely run web applications in the cloud, such as:
- Running intrusion detection and prevention on the application server or firewalls
- Applying hardening principles to cloud application servers
- Using a DMZ to separate cloud accessible services from any local, protected networks
The REI3 platform does include bruteforce protection; as these are only a small subset of possible attacks, they cannot be relied upon alone for safe, cloud-connected operation. Additional actions (as described above) should be taken in all cases.